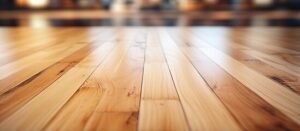
Hardwood Floor Refinishing Bergen County NJ is more than just a refresh; it can completely transform the look of your home. It’s also an opportunity to change up the color of your hardwood floors or add a deeper stain.
Often, you will want to remove your baseboards before refinishing your wood floors. This helps to prevent any dust from getting on your walls and furniture.
There are a number of ways to improve the look of hardwood floors, including cleaning and polishing. However, major scratches or gouges that cannot be resolved with these methods require refinishing. This is a more extensive process that involves sanding down the floors and then applying a new coat of finish. Generally, homeowners will refinish their floors every 7 to 10 years or when they begin showing signs of significant wear.
When refinishing hardwood floors, it is important to prepare the floor and subfloor properly. This will help ensure the success of the refinishing job and increase the longevity of the finished floor. Taking the time to do this right will save both time and money in the long run.
The first step in preparing the floor for refinishing is to remove all furniture from the room. This will allow for more complete access to the floors, as well as reduce the chance of accidental damage. Next, the floor must be cleaned thoroughly to remove any dirt and debris. Depending on the condition of the floors, this may require several scrubbings with a power sander and vacuuming to remove any remaining debris.
Once the floor is clean, it can be sanded again with a new grit to smooth out the existing surface. During this step, it is also possible to change the color of the floors, if desired.
After the sanding is completed, the floors will be ready for staining. Typically, this will be done with a polyurethane finish. Whether a water-based or oil-based finish is used, it is important to choose a product that is designed for wood floors and that will hold up well to heavy traffic. Oil-based polyurethane is a good choice for high-traffic areas and homes with children and pets. This type of finish dries slowly and can be very smelly, but it is very durable and has a beautiful sheen.
Sanding
While cleaning is a great way to manage surface damage, such as minor scratches, gouges and dents, refinishing is necessary when the existing finish becomes too worn down. This process removes the damaged layer of the wood flooring, leaving a fresh new surface ready for staining and sealing. Major damage to wood floors may be beyond the scope of refinishing and replacement might be the appropriate solution, however, you should always consult your BCC for an assessment of your flooring to determine what is the best course of action.
The sanding process can take four to seven days and is a labor intensive job. Professional floor refinishers use a drum sander for the majority of the room, using a progression of grit levels to create a smooth and even surface. This is usually done in three rounds, with each sanding level getting finer and finer, to create a perfectly smooth surface for the finishing product.
It is important to make sure that your entire home is free of dust during the sanding process. This includes removing all furniture, rugs and bed covers, as well as putting down painter’s tape and plastic to protect wall items like pictures and thermostats from the dust that will be produced during the sanding process. It is also a good idea to turn off the air conditioning during this time as it can contribute to an uncomfortable atmosphere for everyone involved.
Keeping up with regular screening and recoating can delay the need to refinish and help keep your floors looking beautiful longer. Depending on your lifestyle and pets, you may need to have them refinished every 7-10 years to maintain their beauty and protect the wood from moisture damage.
Staining
Staining is the next step in bringing new life to hardwood floors. It can be one of the most difficult and complex parts of a refinishing project, but it is also an important part of making a floor look its best. When done well, staining creates a finished product that enhances the beauty of wood and brings out its natural colors. However, it is important to note that staining can often highlight the existing damage and scratches that are not completely resolved during the sanding process.
Before you apply the stain, it is a good idea to ensure that you have sufficient ventilation and wear a mask to protect yourself from the fumes. Depending on the stain type, it may be necessary to prep the surface before applying it with a buffer and carpet pad or lambs wool applicator. This will help the stain adhere to the wood and prevent peeling or flaking later on.
When you start applying the stain, make sure to do it in small sections and work with the grain. Be sure to wipe away any excess stain before moving on to the next section, as it can be difficult to wipe off a wet edge once it dries. This will help you avoid lap marks and keep your stain even and consistent throughout the entire room.
Once the stain is dry, you will need to seal it with a polyurethane finish. This will add a beautiful shine to the floor while protecting it from moisture damage and fading. There are many different types of finishes available, so consult with your flooring professional or the stain manufacturer to determine which will be best for your floor and desired look.
Sealing
When a hardwood floor is sealed, it provides a durable barrier against daily wear and tear. This reduces the need for refinishing and limits damage caused by spills, scratches, and scuffs. A professional can help you choose the right sealer for your particular flooring type to protect it for years to come.
Hardwood floors are a beautiful addition to any home, but they can easily become damaged over time. Heavy foot traffic can cause them to look dull or scratched, and pets can claw at them. Using area rugs in high-traffic areas and keeping pets’ nails trimmed will limit the amount of damage they do.
The first step in refinishing wood floors is to sand them. This process requires special equipment and can take two to four days depending on the size of the room. It’s important to sand in the direction of the grain, and use progressively coarser grits as you go.
Once the sanding is done, the floor can be stained. The best stain for wood is penetrating, as it will soak into the wood and provide maximum protection. Then, a coat of polyurethane is applied. This is the most common topcoat finish for wood, and it’s available in a wide variety of finishes from matte to glossy.
If you’re looking for a durable, long-lasting finish, opt for oil-based polyurethane. It penetrates deep into the wood and gives a beautiful amber color. However, it’s more difficult to apply than water-based polyurethane and emits harmful vapors that can linger for weeks until they clear. This makes it an ideal choice for commercial spaces but not a good option for households. Water-based polyurethane is a safe and effective alternative to oil-based finishes.
Finishing
Hardwood floors can last a lifetime with proper care, but even the most beautiful hardwood flooring will eventually wear out. Depending on the condition of your floors, refinishing or resealing may be an option to extend their lifespan. While refinishing is more labor-intensive and costly than resealing, it can restore your hardwood floors to their original beauty and protect them from future damage.
Before refinishing your wood floors, you need to remove all furniture and cover all exposed trim with plastic sheeting. This will keep dust from migrating to the rest of your home during the refinishing process. Make sure any floor registers are taped off as well so your refinishing equipment won’t scratch them.
Once your floors are sanded, it’s time to apply the new finish. This can take a day or multiple days to complete. First, a tack cloth or mineral spirits is used to thoroughly clean the floors and remove any remaining residue from the old finish. Then, the final sanding is completed with different grits of sandpaper until the desired texture and sheen is achieved.
After the sanding and staining process is complete, the floor will need to dry completely before you can walk on it again. During this time, it is recommended that you close your doors and windows to prevent the hardwood from becoming too damp and causing mold or other problems. You should also wait a week or more before you put back any rugs and furniture.
Finally, once the floor is fully dry, you can apply a coat of polyurethane to protect your investment. Be sure to follow the manufacturer’s instructions for drying times and temperature settings.